
Your dog just comes from playing in the backyard or from its daily walk to the park, it leaps on your lap and you rub its belly as you use too, when you notice a big red bump tick bite on your arm or hand. You immediately peep out your dog’s fur: A Dog Ticks Removal has bitten you.
Some people may think that all ticks, fleas or animal insect are the same, but not. Male brown dog ticks and nonengorged female ticks are flat and brown. Deer ticks are microscopic; you can barely notice them if they haven’t had sucked your blood yet. Like the female ticks fill up on your dog’s blood they commence leaving gray eggs around a quarter inch long. They use four small legs on every side near their mouth. The deer tick is known as the main Lyme disease carrier and can be harder to remove than the dog tick because it is much tinier.
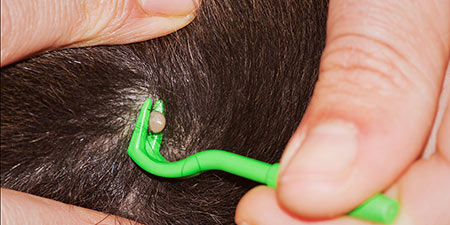
How to proceed for a safety dog tick removal? First, place and order a fine-tipped tweezers or you can either use the modern tick removal instruments they put on sale at your local pet supply superstore. The new instruments help you retire the tick without squeezing the tick’s body so you don’t introduce stressful bacteria from the tick into your dog’s bloodstream.
Step one: Grab the tick by the legs or its mouth firmly, when they are about to enter the skin. This might be hard if the tick isn’t engorged with blood. Do not grab the tick from the body.
Step two: Now you have accomplished the tick head removal, tow firmly layout and out in a upright direction. Don’t twist the tick as you are pulling it out.
Step three: Tightly grabbed with the tweezers, put the dog tick in a jar of alcohol to kill it. Ticks don’t die when you flush them down the toilet.
Step four: Some bacteria were release during the tick removal, dab your dog’s skin with a special dog insecticide.
Step five: Wash your hands with alcohol.