
How to Patch Drywall
Drywall damage is one of the most common problems homeowners face. For example, small dents, nail holes, cracked corners, and larger openings can make walls look worn and unattractive. Learning how to patch drywall is an important home improvement skill because it helps maintain the appearance and value of a house without hiring expensive contractors. Whether the damage comes from furniture, accidents, or everyday wear and tear, repairing drywall can restore walls to a smooth and clean condition.
Drywall repair may seem difficult at first, but with the right tools and patience, even beginners can achieve professional-looking results. In particular, understanding the proper methods for repairing corners, fixing large holes, and smoothing small imperfections can make a huge difference in the final appearance of the wall.
How to Patch Drywall
Understanding how to patch drywall starts with identifying the size and type of damage. Generally, small nail holes and minor dents are usually easy to repair with lightweight spackle or joint compound. However, larger cracks or damaged areas require drywall tape, replacement sections, and additional sanding to create a smooth finish.
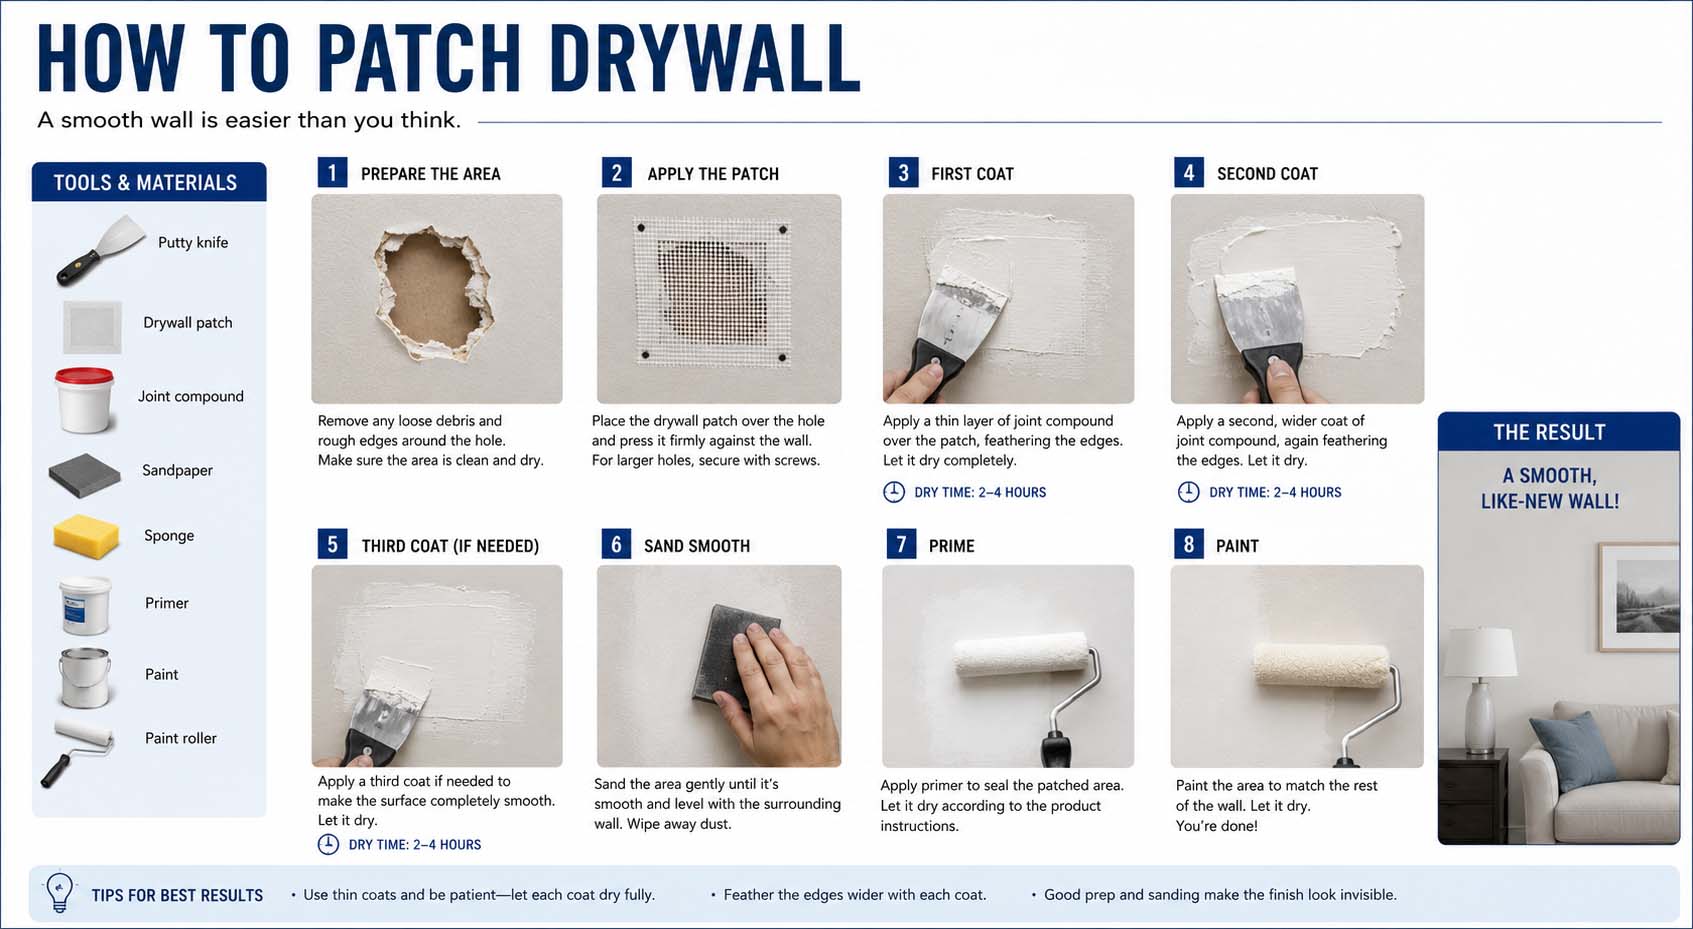
The first step in drywall repair is preparing the damaged area. Before applying any patching material, loose paint, broken drywall pieces, and dust should be removed. As a result, clean surfaces allow the compound to stick properly and create a stronger repair. After cleaning the area, patching compound can be spread over the damaged section using a putty knife.
For small holes, one layer of compound may be enough. On the other hand, larger repairs often require several thin layers to avoid uneven surfaces. Allowing each layer to dry completely before sanding is important because rushing the process can cause cracks or rough textures..
How to Patch Drywall Corners
Many homeowners struggle with how to patch drywall corners because corners are more vulnerable to cracks and dents than flat wall surfaces. For instance, drywall corners often become damaged from furniture bumps, moving boxes, or regular household activity. Moreover, repairing corners properly requires attention to detail because uneven edges are easy to notice after painting.
Minor corner cracks can usually be repaired with joint compound and drywall tape. First, the damaged section should be cleaned and lightly sanded to remove loose material. Afterward, drywall tape is applied over the crack to reinforce the corner and prevent future splitting. Then, joint compound is spread over the tape in thin layers.
For more serious damage, corner bead replacement may be necessary. In fact, metal or plastic corner beads help protect drywall edges and create straight, sharp corners. If the corner bead becomes bent or detached, it should be removed carefully before installing a new piece. Finally, the replacement bead is attached securely and covered with multiple layers of joint compound to create a smooth transition.
How to Patch a Large Hole in Drywall
Learning how to patch a large hole in drywall is essential for homeowners dealing with major wall damage. For example, large holes are often caused by accidental impacts, plumbing repairs, or electrical work. Unlike small repairs, large drywall holes require replacement material to rebuild the damaged section.
The repair process usually begins by cutting the damaged area into a neat square or rectangle. Consequently, straight edges make it easier to fit a replacement drywall patch securely into the opening. Measuring carefully is important because gaps between the patch and existing wall can make finishing more difficult.
Next, a replacement drywall piece is cut to match the opening size. In addition, support boards or drywall clips may be attached behind the wall to hold the patch firmly in place. Once secured with drywall screws, drywall tape is applied around the seams to strengthen the repair and prevent cracks from appearing later.
Afterward, joint compound is spread over the seams in thin, even layers. Because the compound shrinks slightly as it dries, large repairs often require multiple applications. Moreover, sanding between coats helps create a smooth surface that blends with the surrounding wall.
How to Patch Holes in Drywall
Homeowners frequently search for how to patch holes in drywall because small wall damage is extremely common in everyday living spaces. For example, hanging pictures, moving furniture, and accidental impacts can all leave holes that make walls look damaged and outdated. Fortunately, repairing these imperfections is usually simple and affordable.
Tiny nail holes can often be fixed using a small amount of spackle applied directly into the opening. After drying, the area is lightly sanded and painted. Meanwhile, medium-sized holes may require mesh patches or self-adhesive repair kits to support the compound and create a stronger repair.
Consistency is important when applying drywall compound. Since thick layers take longer to dry, they may crack over time. In contrast, thin, even applications produce smoother results and reduce sanding work later. Ultimately, patience during drying and sanding creates a more professional finish.
Common Mistakes During Drywall Repair
Many drywall repair problems happen because people rush the process or skip important preparation steps. For instance, one common mistake is failing to clean the damaged area before applying compound. As a result, dust and loose debris can weaken the repair and cause peeling later.
Another frequent issue is applying too much compound at once. Consequently, thick layers dry unevenly and require more sanding. Instead, using several thin coats creates stronger and smoother results. Skipping primer before painting is also a mistake because repaired areas may absorb paint differently than the surrounding wall. Likewise, homeowners completing other household projects may need guidance about the best paint for cabinets or how to program garage door opener.
Benefits of Repairing Drywall Quickly
Fixing drywall damage quickly prevents small problems from becoming larger repairs. In particular, cracks and holes can worsen over time if moisture or repeated impacts affect the area. Therefore, prompt repairs keep walls looking attractive and help maintain home value. Additionally, homeowners addressing moisture concerns may also consider a vapor barrier crawl space.
Conclusion
Learning how to patch drywall is a valuable skill that can help homeowners maintain beautiful and damage-free walls. Whether repairing minor dents, fixing drywall corners, restoring large holes, or patching small openings, the right techniques can produce professional-looking results. Ultimately, proper preparation, careful sanding, and smooth finishing are essential for successful drywall repair.